A rich, spiced cassava cake recipe with deep coconut flavor — plus a chef’s creative twist on the classic and answers to the questions bakers ask most.
Editor’s note:
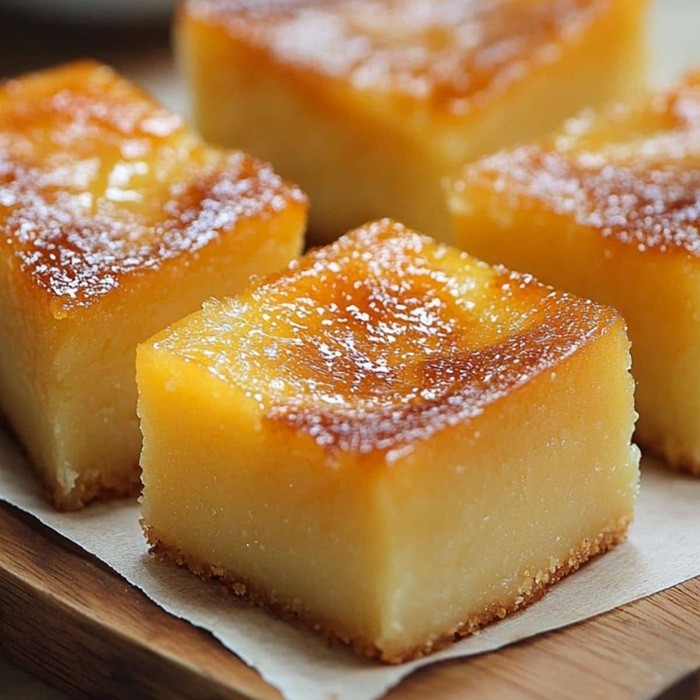
Cassava cake is a dense, coconut-spiced baked dessert made from grated cassava root, a staple of Caribbean home baking. It’s the kind of treat that shows up at gatherings wrapped in foil and passed hand to hand rather than plated, its slow-cooked coconut and warm spice filling the kitchen for hours before anyone’s allowed a bite. There’s no rushing this one — the long simmer, the long bake, and the long cool are all part of what gives it that dense, custardy chew. One thing worth knowing: resist the urge to slice into it while it’s still warm, since the texture needs that full stovetop cool-down to set properly. Treat this recipe as a starting point rather than a fixed formula, because a cake built on patience like this one has room to become something else entirely.
— Chef Pepper Sage
Cuisine: None | Category: Dessert
Ingredients
- 2 Lbs Cassava
- 1 lb Dark Brown Soft Sugar
- 1 can Coconut Milk
- 1/4 Nutmeg
- 1/2 tsp Allspice
- 1/2 tsp Cinnamon
Instructions
Bring coconut milk to a boil.
Add sugar, stirring until completely dissolved and continue to boil for about 45 minutes.
Reserve ½ cup of the coconut milk/sugar mixture for later.
Combine remaining ingredients in a large mixing bowl, stir until well blended.
Add hot coconut milk mixture and stir well.
Mixture should be of a thick liquid texture.
Use 1 tablespoons of coconut milk mixture to grease baking pan.
Pour batter into prepared baking pan and bake at 350°F (basting occasionally with reserved coconut milk mixture) for 2 to 3 hours or until knife inserted in centre comes out clean.
Spread any remaining coconut milk mixture over top of cake.
Place cake on top of stove to cool completely.
Recipe data sourced from TheMealDB.
A Master Twist
The Deep Caramel Confession
Right now, that coconut milk and sugar is just getting to a boil-and-dissolve stage — technically correct, but leaving flavor on the table. Push it further. After the sugar’s fully dissolved, keep the mixture at a slow simmer for another 15-20 minutes past what the recipe calls for, watching for the moment it darkens from pale gold to a deep amber and starts smelling nutty instead of just sweet. You’re chasing the same Maillard magic that happens when you brown butter — except here it’s the milk solids and sugars in the coconut milk doing the caramelizing, not dairy fat. The payoff is a batter that tastes like it’s already been baked for hours before it even hits the oven, with a butterscotch depth that plain boiled coconut milk just can’t touch.
Ingredient swap: Trade nothing — just extend the simmer time and swap your basting brush technique to paint that darker glaze on more aggressively during the last 30 minutes of baking, so the top develops real lacquer instead of a light sheen.
Chef’s Intel: This is the same reaction pastry cooks lean on for browned coconut butter — cook the fat-and-sugar mixture low and slow until the proteins brown, and you get complexity that no amount of extra spice can fake.
Watch for: Don’t walk away during that extended simmer. Coconut milk scorches fast once it darkens, and the line between “gorgeously caramelized” and “burnt and bitter” is about 90 seconds.
The Banana-Leaf Bundle
Instead of one big pan, portion the batter into individual banana-leaf packets before baking — a format borrowed straight from the tradition of wrapping sticky, coconut-based batters in banana leaf before cooking, which is how half the tropical world handles dense, starchy desserts like this one. The leaf does double duty: it steams the interior slightly even inside a dry oven, keeping the crumb tender, and it perfumes the cake with a faint grassy sweetness you genuinely can’t get from a metal pan. If you’ve made my Jamaican callaloo and saltfish, you already know how much West Indian cooking leans on leaf-wrapping for both flavor and portion control — this is that same instinct applied to dessert.
Ingredient swap: No changes to the batter itself — just portion into individual banana-leaf pouches (available frozen at most Asian or Latin markets) instead of a single baking pan, and reduce bake time to about 45-60 minutes per pouch since individual portions cook faster than one dense slab.
Chef’s Intel: Leaf-wrapping is a technique, not a garnish — it’s load-bearing in cuisines from the Philippines to Trinidad precisely because it manages moisture and flavor at the same time.
Watch for: Thaw and pat the leaves fully dry before filling, and don’t overfill each pouch — they need room to seal, or the batter leaks out during baking.
The Slow-Set Remix
This cake already does something most desserts don’t: it cools completely at room temperature instead of rushing into the fridge, which happens to be exactly the process that builds resistant starch — the kind that feeds beneficial gut bacteria rather than spiking blood sugar the way fully digestible starches do. Lean into that instead of fighting it. Cut the sugar by a quarter and let the cassava’s natural earthiness carry more of the flavor, then let the finished cake rest, covered, overnight before serving instead of eating it same-day. The texture actually improves — it firms into something closer to a dense, chewy pudding-cake — and you’re not losing sweetness so much as trading some of it for a more grown-up, less cloying finish.
Ingredient swap: Reduce the dark brown sugar from 1 lb to about 12 oz, and add a scant teaspoon of orange or lime zest to the batter to brighten what the lower sugar level leaves behind.
Chef’s Intel: The overnight rest isn’t just about convenience — the slow cooling and retrogradation that happens as starchy foods sit is the same mechanism nutrition researchers point to when cassava’s resistant starch content comes up.
Watch for: Don’t skip the zest if you cut the sugar — without it, the reduced-sugar version can taste flat rather than balanced.
Between the caramel confession and the leaf-wrapped detour, this cake’s spent 2-3 hours in the oven and a lifetime in banana leaves it never asked to visit — but that’s the price of being the rare dessert patient enough to improve while it just sits there and cools.
— Chef Pepper Sage
FAQ
Why does this cassava cake cool on the stovetop instead of the fridge?
Cooling it slowly at room temperature lets the cake fully set before it’s cut. If you rush the process by cutting into it warm or moving it straight to the fridge, the interior can collapse or look undercooked even though it’s actually done — the texture needs that gradual cool-down to firm up properly.
Can I use frozen grated cassava instead of fresh?
Yes, frozen grated cassava works well as a substitute for the 2 lbs of fresh cassava in this recipe. Just thaw it completely and drain off any excess liquid before mixing, since extra moisture can throw off the batter’s thick consistency and lead to a soggier cake.
I baked it for close to 3 hours and the center still looks wet — what went wrong?
This usually comes down to too much moisture in the mixture, either from under-drained cassava or from not boiling the coconut milk and sugar long enough to thicken properly in step two. Test doneness with a knife in the center rather than going by time alone, since oven and pan differences can shift the bake well past the 2-hour mark.
How should I store leftovers, and can I freeze it?
Once fully cooled, keep it in an airtight container in the refrigerator, where it’ll stay good for up to 5 days. For longer storage, slice it into portions and freeze for up to 3 months, then thaw in the fridge overnight before serving.
What’s the best way to serve this cake?
It’s traditionally cut into squares and served at room temperature, though a quick warm-up brings out the spice notes from the nutmeg, allspice, and cinnamon even more. A cup of strong coffee or tea makes a natural pairing alongside it.